When working in audio post-production, engineers often deal with bit depth reduction—such as bouncing down from a 24-bit mix session to a 16-bit master for distribution. This process, though necessary, can introduce unwanted distortion and artifacts. The solution? Dithering.
The word might sound like a technical buzzword, but for anyone serious about audio post-production, it’s a crucial final step. It’s the process that can make the difference between a clean, professional mix and one that’s marred by unwanted noise and artifacts. So, what exactly is dithering, and why is it so important? Let’s dive in.
Table of Contents
What is Dithering?
Dithering is the process of adding very low-level noise to an audio signal when reducing its bit depth. At first, adding noise to audio might sound counter intuitive, but this controlled noise helps mask quantization errors and prevents audible distortion. The result is a smoother, more natural sound in the final product.
Think of dithering as “blurring the edges” of digital audio so that imperfections from bit reduction don’t stick out.
A Simple Analogy
Think of a digital audio signal as a series of steps. When you record or process audio, you’re essentially creating a digital representation of the analog sound wave. The more bits you use (e.g., 24-bit vs. 16-bit), the more “steps” you have to represent the audio’s dynamic range. This is known as bit depth.
Now, imagine you’ve created a beautiful, detailed drawing using a wide range of colored pencils. But you need to present it on a canvas that can only use a limited number of colors. When you try to represent a color that isn’t available, the closest one is chosen. This can lead to a less-than-perfect representation, with blocky, abrupt changes in color.
In audio, this is similar to what happens when you reduce the bit depth of a signal. For example, when you go from a 24-bit project file to a 16-bit file for a CD, you’re essentially “rounding off” the audio’s precision. This rounding process is called quantization, and it introduces an audible artifact known as quantization distortion or quantization noise. This noise is often harsh, buzzy, and particularly noticeable on quiet parts of the audio, where the digital signal has fewer steps to work with.
Here are two clear diagrams showing the difference:
Top:
Quantization without dithering – harsh, stepped distortion.
Bottom:
Quantization with dithering – smoother, closer to the original sine wave.

Dithering: The Noise that Fights Noise
Dithering is a technique used to combat this quantization noise. It involves adding a very small amount of low-level, random noise to the audio signal before the bit depth reduction.
This might sound counterintuitive. Why would you add noise to get rid of noise?
The magic of dithering lies in how our ears and brain perceive sound. By adding a carefully engineered, random noise signal, you are essentially “randomizing” the quantization errors. Instead of the harsh, predictable quantization distortion, you get a much more pleasant, continuous, and “shhh”-like noise floor. This dither noise is much less audible and much easier for our brains to ignore than the buzzing of quantization distortion.
Why Do We Need Dithering?
When reducing bit depth:
Without dithering → You may hear quantization distortion (harsh, buzzy, or gritty artifacts).
With dithering → The added noise makes the distortion less noticeable, resulting in a more transparent and musical sound.
For example, going from 24-bit to 16-bit audio without dithering can cause distortion in very quiet passages like reverb tails, fades, or soft dialogue. Dither ensures these remain smooth and clean.
Types of Dither
Not all dither is the same—different noise shapes are used depending on the application:
Rectangular or Triangular Dither (TPDF):
Basic forms of dither that evenly spread noise across the frequency spectrum.
Noise-Shaped Dither:
Pushes most of the dither noise into less audible frequency ranges, making it less noticeable to the human ear. This is often preferred in mastering.
Where is Dithering Used in Post Production?
Dithering is a process you should only perform once on your final mix or master. This is typically the very last step, right before you export your file to a different bit depth (e.g., from 32-bit float to 24-bit or 16-bit).
Most Digital Audio Workstations (DAWs) and mastering plugins offer a dithering option. When you go to export your file, you’ll often see a drop-down menu with different dither types. Common types include:
Type 1 (Triangular):
This is a basic form of dithering that adds a random noise floor. It’s a good all-around choice.
Type 2 (Noise-Shaped):
This is a more advanced technique that moves the audible dither noise to frequencies where our ears are less sensitive (e.g., very high frequencies). This results in an even quieter perceived noise floor.
Mastering:
When exporting the final mix to 16-bit for CD or certain streaming formats.
Archiving & Delivery:
For compatibility with client specifications requiring lower bit depth.
Broadcast: Ensures cleaner sound when preparing material for radio, TV, or streaming platforms.
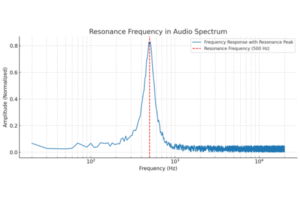
Here’s the frequency-domain comparison:
Without dithering
quantization distortion creates strong harmonic spikes.
With dithering
distortion is masked by low-level broadband noise, making it less noticeable to the ear.

Best Practices for Applying Dither
Only Apply Once:
Dither should be added only at the very last stage when reducing bit depth. Applying it multiple times just increases noise unnecessarily.
Choose the Right Type:
Use simple triangular dither for general audio, and noise-shaped dither for final mastering.
Don’t Overthink It:
While essential, dithering is subtle. The differences may not be obvious on laptop speakers, but they matter in professional environments.
Key Takeaways for Your Workflow:
Don’t Dither Until the End: Only dither the final mix or master. Dithering multiple times can actually increase the noise floor.
Use It When Changing Bit Depth:
Dithering is necessary when you are reducing the bit depth of your audio file. For example, going from a 24-bit session to a 16-bit CD master.
Choose the Right Type:
Most modern DAWs have excellent dither algorithms. If you have the option, a noise-shaped dither (like Type 2) is often the best choice for its superior noise performance.
Listen and Compare:
If your ears are sensitive enough, try exporting your file with and without dithering and listen to the quietest parts. The difference can be subtle but significant.
Dithering is a subtle but powerful tool in the audio post-production toolkit. By understanding its purpose and applying it correctly, you can ensure that your final audio product is as clean, clear, and professional as possible. It’s the final polish that can take your mix from good to great.
Conclusion
Dithering may be one of the least glamorous aspects of audio post-production, but it plays a vital role in maintaining fidelity when moving between bit depths. By adding a touch of controlled noise, engineers preserve the clarity and smoothness of their mixes—ensuring that the final product translates well across all playback systems.
In short: Dither once, dither right, and let your audio shine without digital artifacts.