Table of Contents
Top 7 Tips To Reduce Sibilance In Microphones & Audio Mixes
If you’ve ever listened back to a vocal track and noticed harsh “sss” or “shh” sounds cutting through the mix, you’ve encountered sibilance. While natural to human speech, sibilance can be distracting, fatiguing, and unpleasant when overemphasized in recordings or live performances. It often becomes more pronounced with certain microphones, recording environments, or mixing choices.
The good news? With the right techniques, you can tame sibilance and achieve a smooth, professional sound. Here are the top 7 tips to reduce sibilance in microphones and audio mixes.

1. Choose the Right Microphone
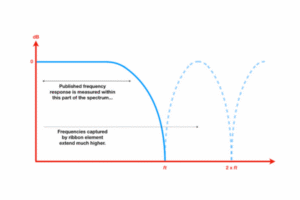
Not all microphones handle high-frequency detail in the same way. Condenser microphones, while bright and detailed, often accentuate sibilance more than dynamic or ribbon microphones. If you’re recording a singer prone to sibilance, try:
A ribbon microphone for a smoother top end.
A dynamic mic like the Shure SM7B, known for controlling harshness.
Testing multiple mics during setup to find the best fit for the vocalist.
2. Adjust Mic Placement and Angle
Sibilance is strongest when the microphone capsule is directly in line with the singer’s mouth. You can reduce it naturally by:
Positioning the mic slightly off-axis (angled 20–30°).
Lowering the mic to capture more chest resonance rather than straight air bursts.
Increasing the distance between the mouth and mic.
Sometimes, even a small shift in angle makes a huge difference.
3. Use a Pop Filter or Windscreen
Pop filters aren’t just for plosives (“p” and “b” sounds). They also help diffuse the air that carries sibilant frequencies. A double-layer nylon pop filter, or even a foam windscreen, can subtly tame those sharp “sss” sounds before they ever reach the mic.
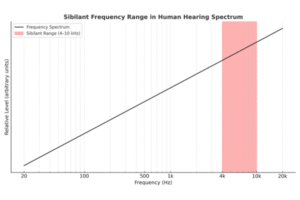
4. Apply EQ Cuts in the Sibilant Range
Sibilance usually lives between 4 kHz and 10 kHz. If you notice harshness:
Use a narrow EQ notch to reduce problem frequencies.
Sweep through the high range to identify the most piercing spot.
Avoid overcutting, since too much EQ reduction can make vocals sound dull or muffled.
5. Use a De-Esser Plugin
A de-esser is the go-to tool for controlling sibilance in mixing. It works like a frequency-specific compressor, reducing volume only when sibilant frequencies appear. Tips for effective use:
Start with a de-esser preset for vocals.
Adjust threshold so it reacts only to “sss” sounds, not the whole performance.
Use multiple gentle passes rather than one aggressive setting.
6. Control Dynamics Before the De-Esser
If your vocal is heavily compressed before de-essing, sibilance will often jump out more. Try:
Applying light compression first, then de-essing.
Using parallel compression to maintain body without exaggerating sibilance.
Avoiding over-compression, which brings out unwanted high-frequency harshness.
7. Manual Editing for Precision
Sometimes, the most natural solution is the most hands-on:
Zoom into your vocal track.
Identify the overly harsh “sss” sounds.
Reduce clip gain just on those sections.
This manual method takes time but gives you total control—often resulting in the smoothest, most transparent fix.
Final Thoughts
Sibilance is a natural part of speech, but when overemphasized, it can ruin an otherwise perfect recording. By carefully choosing microphones, adjusting placement, and using tools like EQ and de-essers, you can achieve a polished, professional vocal mix.
The key is balance—you want to tame harshness without losing clarity and brightness. With these seven tips, your mixes will sound cleaner, more pleasant, and ready for broadcast or streaming.