In audio recording, microphone placement is just as important as microphone choice. One often-overlooked principle that can dramatically improve clarity and reduce unwanted noise is the 2:1 Rule of Ambience. This rule helps audio engineers, podcasters, and filmmakers achieve a cleaner, more natural sound by managing how much room tone (ambience) each microphone captures.
Table of Contents
What Is the 2:1 Rule of Ambience?
The 2:1 Rule of Ambience is a simple guideline:
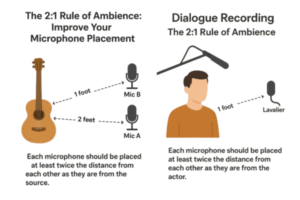
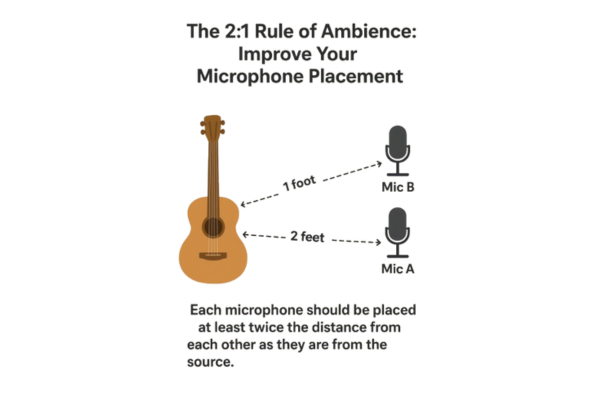
When using multiple microphones to capture the same sound source, each microphone should be placed at least twice the distance from each other as they are from the source.
For example:
If Mic A is 1 foot from a guitar,
Mic B should be at least 2 feet away from Mic A.
This spacing helps minimize phase issues (where frequencies cancel each other out) and controls how much of the room’s ambience “leaks” into each mic.
Why Does It Matter?
Sound travels fast—about 1,130 feet per second at room temperature. When you speak into a microphone, your voice reaches the mic directly. But it also bounces off nearby surfaces and arrives at the microphone slightly later as reflected sound. This creates several problems:
Phase Coherence
Sound waves reach microphones at slightly different times depending on distance. If microphones are too close to each other, the time difference can cause frequencies to cancel, resulting in a thin, hollow sound. The 2:1 rule reduces this risk.
Balanced Ambience
Every mic picks up some room reflections, which can muddy a mix if not controlled. Following the rule ensures ambience sounds natural instead of overpowering.
Improved Clarity
Whether recording a voice, instrument, or dialogue on set, proper spacing preserves detail while still keeping a sense of “space.”
Practical Applications
For Content Creators
If using a desktop microphone, elevate it on a stand to get it away from your desk surface
Create a “acoustic triangle” where you, the microphone, and reflective surfaces follow the 2:1 rule Use soft furnishings (blankets, pillows, curtains) to absorb reflections within the critical zone
Recording Acoustic Guitar
Place one mic near the 12th fret, about 8–12 inches away.
Position a second mic near the body or bridge, ensuring it’s at least twice the distance from the first mic relative to the guitar.
Dialogue in Film/TV
A boom mic above the actor may be 1 foot from their mouth.
A lavalier mic clipped on the actor’s chest should follow the 2:1 spacing rule to avoid phasey, hollow dialogue when both tracks are blended.

Drum Overheads
When using two overheads, applying the 2:1 rule helps prevent phasing between left and right channels while still capturing room ambience.
When You Might Break the Rule
Like most audio principles, the 2:1 rule is a guideline, not a law. You might choose to break it when:
Creative Effect –
Phasing can sometimes add character to a sound.
Close-Miking –
If you want an isolated, dry signal with little ambience, you may ignore the rule but mute or carefully mix multiple mics later.
Stereo Imaging –
For techniques like XY or ORTF, microphone placement relies on angle and capsule proximity rather than the 2:1 rule.
Tips for Using the 2:1 Rule Effectively
Always measure from source-to-mic, not mic-to-mic.
Trust your ears—listen in mono to check for phase issues.
Use headphones during setup to catch problems before recording.
Combine the rule with polar pattern knowledge (cardioid, omni, etc.) for best results.
Conclusion
The 2:1 Rule of Ambience is one of those timeless audio engineering tricks that saves countless mixes from muddiness and phase problems. By keeping microphones properly spaced, you preserve clarity, maintain natural ambience, and give yourself more control in post-production.
Next time you set up for a recording—whether it’s an acoustic guitar, dialogue scene, or drum kit—remember this simple ratio. It could be the difference between a messy mix and a professional-sounding track.